NetBeans 6.5 will soon be witnessing a much needed change in its Database explorer capabilities which can be accessed from the NetBeans Services Tab.
Database explorer, predominantly, has been a database query tool with minimal graphically supported SQL on the site. User, however, is provided with SQL interface from where SQL commands can be authored to perform database operations.
The brand new DataView NetBeans module provides many new features for existing NetBeans database explorer besides providing contemporary look and feel to the existing explorer.
Here is the concise list of some cool features that are being introduced in NetBeans 6.5 DB Explorer. The features will be available with NetBeans 6.5 Milestone 2 Release.
Sort results based on a column
Edit data from a query and commit changes
Display number of returned records
Pagination, Option to set page size
Copy selected records with/without HEADER detail
Generate SQL script for CREATE, INSERT, UPDATE, DELETE statements from resultset data.
New records can be INSERTED in the table using a graphical panel.
Delete Selected rows
Truncate the table
Optimized pagination for MySQL and Postgres
Apart from this, some of the advanced features like suppressing edit buttons and row editing when data is being fetched from multiple tables are part of the recent enhancements.
Also, SQL editor has been empowered by advanced features like SQL Code Completion and SQL History to enthrall the users.
Here is the glimpse of added tooling on the SQL Editor viz-a-viz the existing one.
Sun SOA/MDM team is the prime contributor of this functionality to the NetBeans design community.
If you are looking for some more details on this feature, you can get it here.
Here is step-by-step write-up on how SUN's Open Source Master Data Management (MDM) Suite can be used to build Server Side Data Mashupwithout practically writing any code!
Please note that Data Mashup technology at SUN is being constantly evolved even as you are reading this blog. Intent of this write up is to give readers a detailed peek into existing capabilities and what it could offer when made available in the coming Mural releases.
Here's the use case to aid the concept being explained ...
Sandra owns a small laboratory equipment shop in Denver. Her suppliers have levied a 2% additional tax on the transportation cost which varies based on the distance of delivery. (gas is expensive and nothing is free). Sandra is looking out to optimize her profit margins by sourcing more from near by dealers. She needs a service that gives her distance of delivery of her suppliers. She has her supplier data on a spread sheet and she is able to Google out delivery point address of all lab equipment vendors in the US from Internet (each with unique state allotted vendor ids). Lets see how data mashup can help her with the cost cutting mission.
Prerequisites 1. NetBeans IDE
2. Glassfish App Server
3. SUN Data Integrator and SUN Data Mashup Service Engine (JBI Runtime)
4. SUN Data Integrator and SUN Data Mashup Design time environment NetBeans Modules
Step 1: Identify your data sources
There are two data sources involved here.
Spreadsheet (Data format available with Sandra)
A text file with csv data (Data from Internet)
Step 2: Create Mashup Database
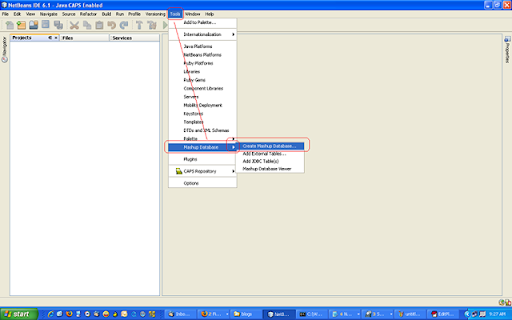
Launch your NetBeans IDE
Go to Tools --> Mashup Database --> Create Mashup Database.
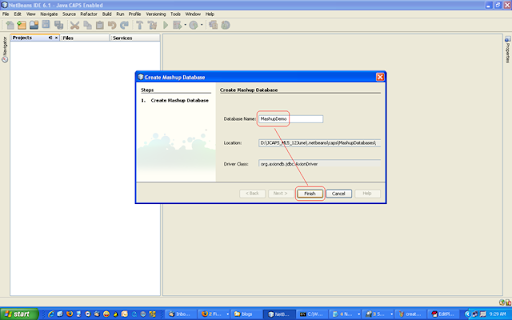
Name the database appropriately for the project/service it serves. Say Finish. A success message confirms that the database was created successfully.
Step 3: Add External table (Spread Sheet) to the created mashup database
As the database involved here is non-relational, data needs to be staged into a relational database so as to use it into a federated data pool.
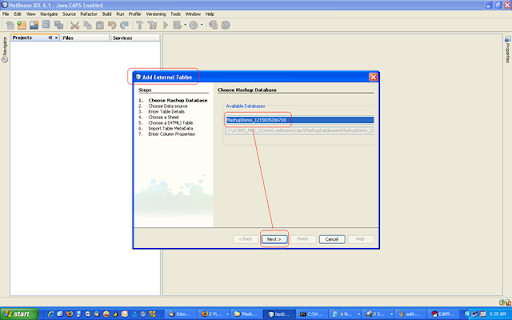
Go to Tools --> Mashup Database --> Add External Tables ...
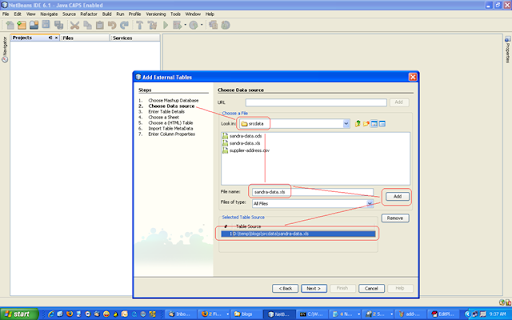
Add the spread sheet data into the mashup database
Browse to the xls folder and select the file. Add it into Selected table list.
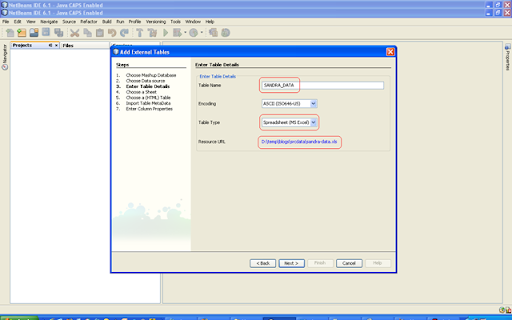
Ensure that correct table type is listed by verifying the highlighted blocks.
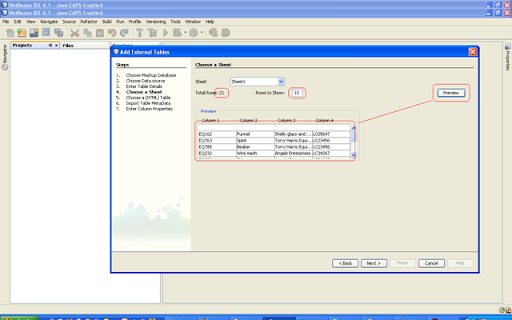
Preview the data and say next.
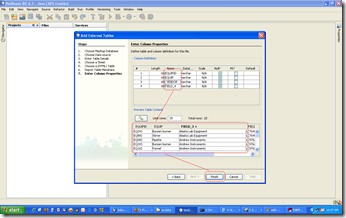
Edit the column properties by double clicking on the column fields in the table. Press enter when done. The changes get reflected in preview table window.
Press Finish and look out for success message to confirm that the table was added.
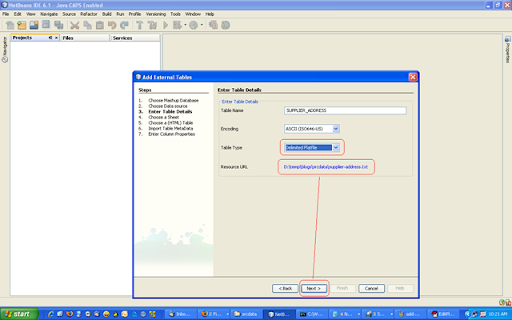
Step 4: Add External table (Text File) to the created mashup database
As the database involved here is non-relational, data needs to be staged into a relational database so as to use it into a federated data pool.
Go to Tools --> Mashup Database --> Add External Tables ...
Add Text file (delimited) data into the mashup database
Browse to the folder with text file. Select and add it into table list. Go to Next.
Ensure that correct table type is listed by verifying the highlighted blocks.
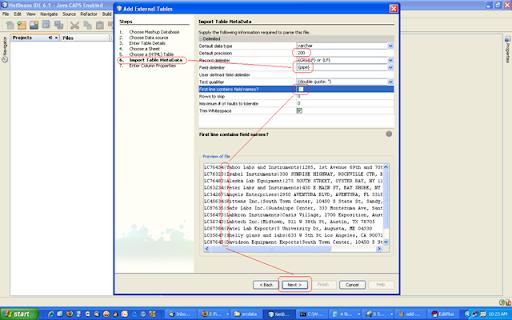
Change the table Metadata properties like default precision, delimiter etc suitable for file setting. Preview if the data in the text file is parsed properly and say 'Next'.
Change the default column names to some appropriate names. Say Finish.
Look out for success message to confirm that the table was added.
Step Verification
Verify that the database was created in the NetBeans Services Tab with tables and columns.
Right click on the table and 'View Data' to see if the data from spread sheet and CSV file in available in the database.
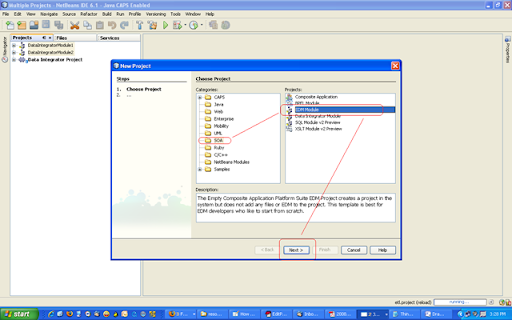
Step 5: Creating Mashup Project using NetBeans
On the NetBeans menu, go to File --> New Project --> SOA --> EDM Module --> Next
Name your mashup project and select the location where you want the project to be created. Finish the wizard.
Observer the Mashup project being created at the specified location. Project also shows up as active project on the NetBeans projects tab
On the NetBeans Project tab, browse to the Mashup Project (SandraEDMApp for this demo). Right click on the 'defaultpackage' node and select New --> Others --> SOA --> EDM --> Next on the pop-up.
Name the EDM file (SandraEDM for this project ) and Finish the wizard. A blank canvas is created on the active NetBeans window. Also, observe that SandraEDM.edm is created under default package of your SandraEDMApp project.
Step 6: Creating Data Join
Till the previous step, we have achieved bringing the diverse data into a common staging area. In order to create federated view, data in the staging tables need to be federated. Here is how it can be done by creating data joins.
From the NetBeans palette, drag-and-drop the join operator on the mashup canvas.
Create New Join View editor comes up on this action.
Press "All" button on the editor to join all the tables. Note that join preview gives an option of editing join types i.e. inner, outer etc.
Select OK to finish the wizard. Canvas will be added with additional root join widget.
Open Properties panel on NetBeans and select Root Join Widget by clicking over it.
Edit the join condition by edit button on Join condition property.
For this case join condition is (SANDRA_DATA.VENDORID = SUPPLIER_ADDRESS.VENDORID) where vendorid was the Licence Id for the vendor.
Do not forget to insert the Runtime Input Argument into the mashup design. You can insert the argument (arg_0 which is the default value) as shown below.
Save the project. Right click on the project and select Build Project. Observer that SandraEDM.wsdl is created below in the project node.
Your Data Mashup is ready to be deployed as a service !!
Step 7: Deploy Data Mashup in Glassfish App Server
To create a composite application, go to NetBeans files menu. Under Files, select --> New Project --> SOA --> Composite Application -- Next.
Select Project Location and Name for the Composite Application Project. For this project, name being selected is SandraEDMCompApp.
Select Finish. Observe that the Composite App project is created on the NetBeans Projects tab. Also observer that a casa (composite application service assembly) editor opens up in the NetBeans.
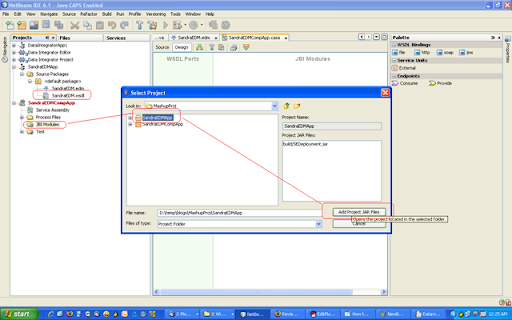
Now add Mashup Application to the JBI modules of the composite app. Right-click on the JBI Modules and select Add JBI Module.. from the list. Select SandraEDMApp project in the list shown and say Add Project Jar File. Observe EDM app being added as JBI Module in the Composite App.
From the casa editor palette, drag and drop the HTTP WSDL bindings into the editor and build the comp app once. An end point for connection to SandraEDMApp comes up on the editor.
Connect the HTTP consumer endpoint to the SandraEDMApp endpoint.
Build the Composite App project once again.
Step 8: Tweaking the Composite App wsdl
* Note that this step would eventually be removed but this is what is needed for now.
Double click and open the wsdl generated in SandraEDMCompApp --> Process files --> SandraEDMCompApp.wsdl
Here is how to tweak the wsdl :
Include part into node <http:operation location="(part)"/>
change <http:urlEncoded/> to <http:urlReplacement/>
Change the http service url to include a concerete port instaed of the default port from where mashup service can be accessed i.e. replace ${HttpDefaultPort} with <available port no on the host>. For this project, I am using 9097
Right click on the Composite Application project and Deploy the Application. Look for the success message and verify the same on the Glassfish Application Server.
where 129.158.238.222 is the ip address of the host running the service.
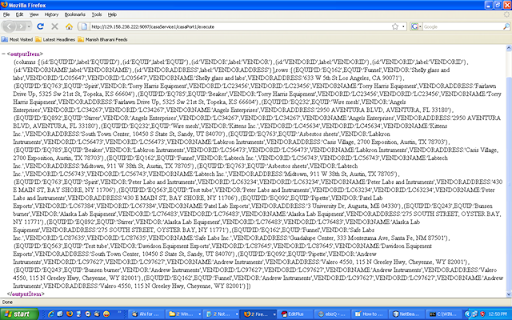
Observe that the federated view of the data in two different data sources is reported in JSON format.
Note that the output data format can be changed to xml or webrowset by changing mashup-engine properties and redeploying the same into Glassfish JBI services.
Step 10: Using the Data from Mashup Service
The JSON output from the service can be parsed using standard JSON parsers in any application. The Vendor addresses can be parsed and fed into a Google Locator service and approximate distance to business addresses can be fetched. Based on this, Sandra (hope we still remember her !) can get some crucial insight about sourcing her business from near-by vendors. By the virtue of being a JBI service, data can also be sent over to other services using SUN Enterprise Service Bus.
Database files used to create this Mashup can be downloaded from here.
It is often desirable to have a desktop utility that could generate PDF out of documents that you read in various formats or share them with your team.
Here is an open source utility that you could download and install that does this job just right!
PDF Creator installs itself on your windows machine just like any other printer on your network. Thus, when you print, the printable content (document, web page, image etc.) gets converted into pdf document and can be saved to your file system.
Of course, Open Office also provides you with a pdf generator for the documents that you can open there but PDF Creator does it like a breeze!
If I have to explain data mashup to someone in the simplest terms, here is what I would say ...
When data from more than one data source (can be heterogeneous sources i.e. RSS, HTML, Spread Sheet, RDBMS , Flat Files, Web Services etc.) is federated and integrated into a single application which can be exposed as a web-service, a Data Mashup is said to have been created. The mashup service created in such a way can be of a completely different character vis-a-vis services or sources that contributed data into this mashup. In other words, data mashup potentially can offer a completely different brand of service by the virtue of federated data that could make the available data more meaningful for the end user.
Broadly speaking, data can be federated into a mashup either on the client side as is done by Yahoo Pipes or it can be done on the Server Side using Open Data Services components from Project Mural
Project Mural offers support for building Server Side Data Mashup. Being fully integrated with NetBeans IDE, it allows syndication of data from various enterprise level data sources and exposes it as a web service. Data Mashup Service engine is a JSR208 (JBI) compliant service that can be deployed in the Glassfish application server. NetBeans also provides for complete graphical support for editing SQL joins between the federated data tables and also supports orchestration of service using BPEL editor.
Project Mural Data Mashup can be build using all Netbeans supported relational data sources. Apart from this, it also supports non-relational sources like Spread Sheets, Flat Files, HTML, RSS and XML by creating relational mappings using the user friendly wizards.
Information provided by the Mashup service is in JSON,XML and WebRowSet format currently. This data can be placed on the enterprise service bus using Open ESB components. Plenty of cool features are planned around this effort in Project Mural in the coming releases.
Stay Tuned and Watch out for more in this category ....
Project Mural is yet another ambitions offering from SUN that was formally announced to the community somewhere in the beginning of June '08 along with the availability of Java CAPS 6.
With this, SUN becomes the First open source MDM software vendor to offer gamut of functionality that empowers various transformational initiatives like CDI (Customer Data Integration), PIM (Product Information Management), Building data services using SOA and creating Enterprise Data mashups.
The suite offers variety of functionality under the single hood. Data management capabilities such as ETL (Extract - Transform - Load), Data Quality (Rules based profiling and cleansing), Matching, Standardization/Normalization, Single entity view generation (called Master Data) from variety of distributed data sources, generation of federated data queries using data mashups are some of it to name a few.
MDM Suite leverages the infrastructure of well established communities like NetBeans, GlassFish and OpenESB as seen in the poster.
The initiatives directly affect the enterprise bottom line by providing indexed, de-duplicated view of distributed data which is cleansed of human errors and free of anomalies.
A lot can be read about it on the following official links.